
You’ll be in love with this fun yet easy tie dye shirt!
It’s no secret that tie-dye is all the rage again. Honestly, though, why did it ever go away? Tie-dye is so much fun! It’s literally the perfect excuse to wear something insanely bright and ultra colorful!
I don’t know about you, but I definitely plan on carrying this trend through the summer (and beyond), and to do that, I made my very own tie-dye shirts. If you’re looking to add some tie-dye flare to your wardrobe this season, I have an easy tie-dye t-shirt design that you are going to love. That’s right—I’m talking about the cutest Tie-Dye Heart T-Shirt.
Read on below to learn how to make this DIY!

Here’s What You’ll Need to Get Started:
- A plain white t-shirt
- A tie-dye kit (I used this kit by Tulip from Joann)
- Rubber bands (They come included with the kit I linked above)
- Plastic gloves (They come included with the kit I linked above)
- Washable markers
- Plastic table cover
- Plastic wrap or a plastic bag
- Plastic or paper plates (optional)
- Paper towel or sheet of paper for the heart template (optional)
Making Your Tie-Dye Heart T-Shirt:
Before you start your tie-dye project, I highly recommend pre-washing the shirt you are going to tie-dye. This is important, particularly if it is a brand new shirt, to remove sizing and any dirt so the dye saturates better. (Do not use fabric softener or dryer sheets, which can leave a residue.) If possible, I would encourage you to leave your shirt damp (don’t throw it in the dryer) before tie-dyeing, as the dye has an easier time saturating the fabric when it’s wet.
Once your shirt is washed, cover the surface you will be working on with a plastic table cover to prevent any messes. You can also line up some plastic or paper plates (this is optional) to help you control any excess dye that may drip as well. Before you start dyeing, put on your protective plastic gloves (you don’t want to have tie-dye fingers!).
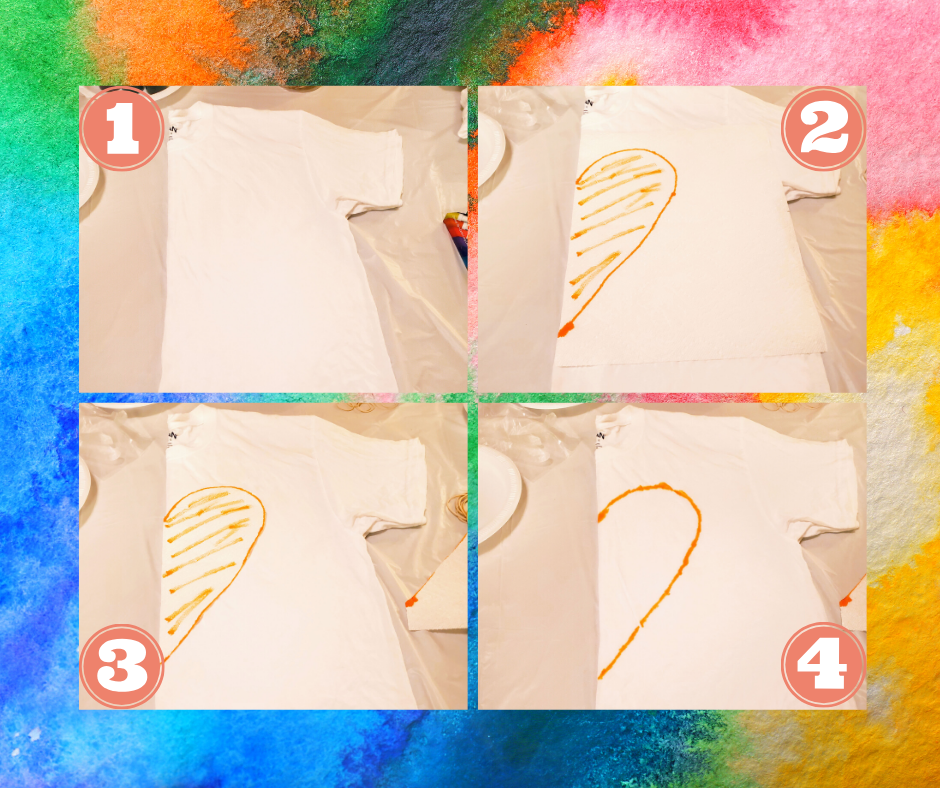
To begin, fold your t-shirt in half vertically and straighten out any wrinkles. Now, using a washable marker (make sure it’s washable so it’ll rinse away when you wash your shirt again later), make your heart template. Since the shirt is folded in half, you only need to draw a half heart (as shown in photo two). I chose to make a heart template first on a piece of paper towel and then placed it over the shirt to make sure I liked the size and shape. Once I was satisfied, I cut out my template and placed the paper towel on the shirt where I wanted the heart to appear against the folded edge and drew along the edge with the washable marker (as shown in photo three). (You don’t necessarily have to cut the half heart out; Since the paper towel is thin enough, you can just trace over the line, and the marker will bleed through to the shirt and create your half-heart shape.)

After your half-heart is drawn onto the shirt, you’re going to fold along the line, starting at the bottom point of the heart. Folding it accordion-style, pinch the fabric so that the heart outline creates a straight line (as shown in photo five). Keep doing this along the entire heart outline until you end up with a completely straight line. You may need to slightly rotate as you reach the curved top of the heart to ensure you continue to get that straight line. Once you have a completely straight line, tie a rubber band along that line to bind the shirt (as shown in photo six). At this point, you could stop to have just one heart at the center of the shirt and one other color for the rest of the shirt, or you can add more rubber bands, like I did, to create more heart shapes around your center heart. I added two other rubber bands after my initial heart so I would get a bigger heart with different color heart frames around the center one. I then bunched the rest of my shirt and bound it with rubber bands in a criss-cross pattern to have a marbled border around the hearts.
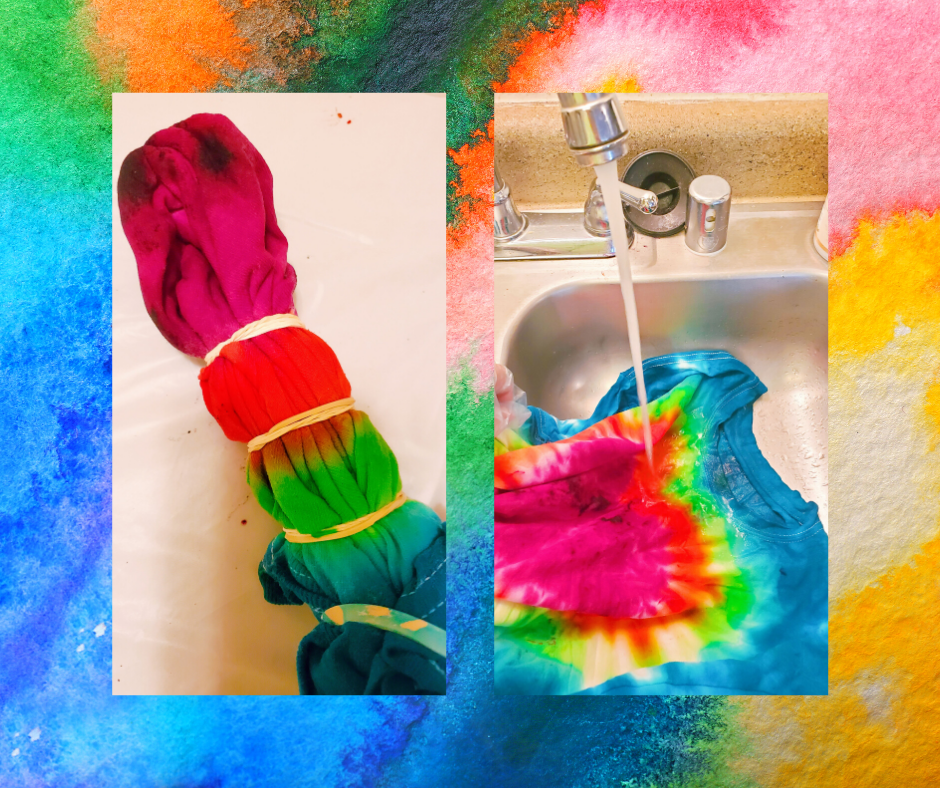
Once you have all the rubber bands in place, apply your dye how you would like. I chose to have different colors for each rubber band section.
After you have applied all of the dye, wrap your shirt completely with plastic wrap or a plastic bag and let it sit overnight (or at least 6-8 hours) to get brighter, bolder colors.
When your t-shirt has had ample time to set, put your gloves back on, remove the rubber bands, and unfold the shirt. Here’s your first sneak peek at your design!
Now, take your shirt to the sink and rinse it out. This will help get out that excess dye. Keep rinsing your shirt until the water runs clear. At this point, it’s time to throw the t-shirt into the wash (make sure it’s the only thing in the washer!). Set your washer to the large load setting with the hottest water suitable for the fabric and put in only a small amount of laundry soap. Wash (and dry if you’d like) separately. If you air-dry your tie-dyed t-shirt, don’t let it rest wet on other items. Also, make sure to wash your tie-dyed shirt separately the first few washes so you don’t end up with other tie-dyed items (ha!).

Congrats, you’ve got your very own adorable Tie-Dye Heart T-Shirt! I hope you like it and that you rock it all summer long! ✌️

And you look awesome in it!
LikeLiked by 1 person
Aww, thank you! We’ll definitely need to make some more tie-dye shirts when you are here!
LikeLiked by 1 person