
Get ready for Halloween (and fall!) with this cute and easy to make Pumpkin T-Shirt!
Get excited, Colorventurers, because spooky season is getting close! I love autumn and all the fun that comes with it: watching fun movies like Hocus Pocus, visiting a pumpkin patch, enjoying the beloved PSL, devouring our favorite sweet treats, and decorating the house with spooky (or fall-related) decor. But perhaps my favorite part of the spooky season is getting the opportunity to wear fun and hauntingly cute clothing!
Speaking of spooktacular fashion, to help you celebrate the holiday season, I have crafted a gourd-geous Pumpkin T-Shirt that will have you looking like a total Hallow-queen (because, girl, you totally are!). This easy and super affordable t-shirt is not only fun to make, but can be easily personalized with all sorts of embellishments to make it the perfect Halloween shirt for you! So, trick or treat yo self to this one-of-a-kind DIY that will have everyone saying, “Oh my gourd, look at her shirt!”

Read on to learn how to make you own Pumpkin T-Shirt!
Here’s What You’ll Need:
- A pumpkin doily, and any other embellishments you’d like (I found this pumpkin doily at Dollar General, but you can also find some at the 99¢ Store!)
- A black t-shirt, or any other color you’d like (I got this Gildan t-shirt from Joann!)
- Liquid Stitch (I picked up mine from Walmart, but you can use any fabric glue!)
- A cookie sheet or anything else you can use as a hard, flat surface for your shirt

Here’s How to Make Your Pumpkin T-Shirt:
Before you begin your project, make sure the shirt you will be using has been washed to remove any residue that would prevent the fabric glue from properly adhering your pumpkin doily to your shirt. If your shirt is clean and ready to go, let’s begin!
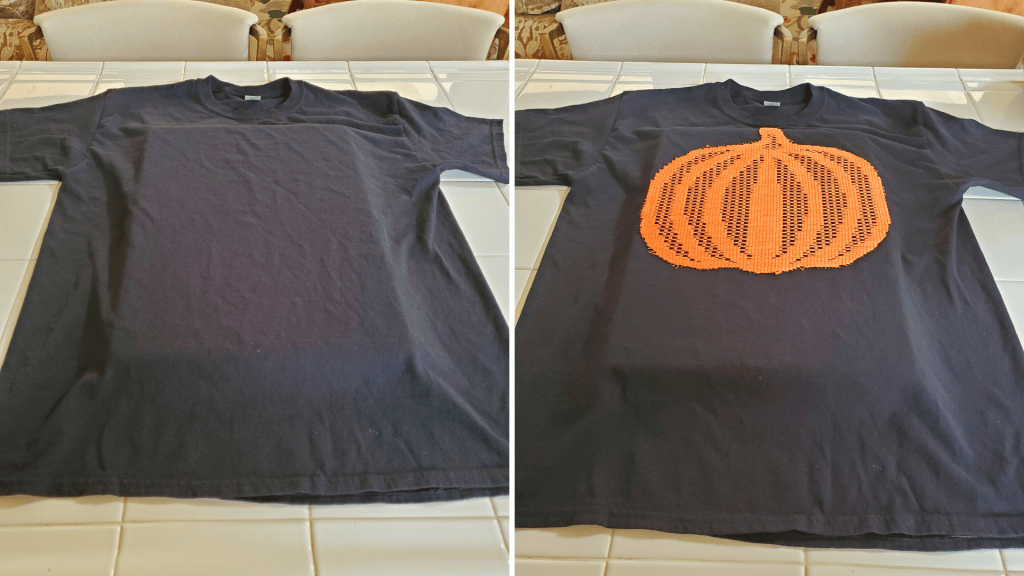
Start by laying your shirt flat on your work surface. Taking a cookie sheet (a piece of cardboard would work, too!), flip it upside down so the bottom of the sheet is facing up and gingerly slide it in between the layers of your shirt all the way to the neckline. This will ensure that your shirt is nice and flat when trying to glue to pumpkin doily to it. Now, take your pumpkin doily and lay it out on your shirt where you would like for it to be glued. Position the pumpkin until you like the placement; once you have started to apply glue, it will be difficult to move your pumpkin!
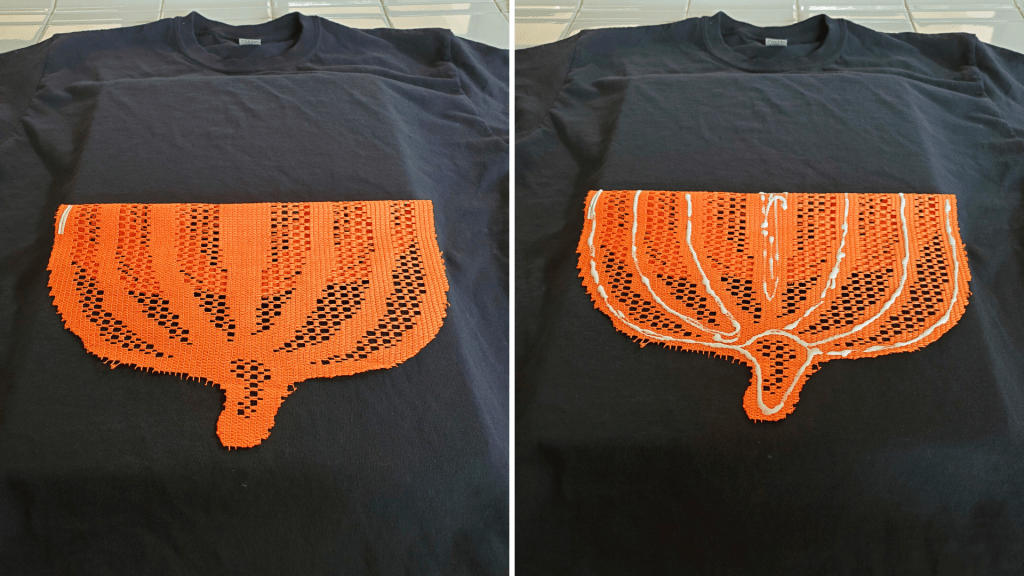
Once your pumpkin doily is positioned where you would like for it to be on the shirt, gently fold up the bottom half of the pumpkin (like shown below) and apply your fabric glue. Now, delicately fold the bottom of the pumpkin back over (don’t be afraid to grab an extra pair of hands if you need help with this part!) and pat your pumpkin down so the glue starts to stick to the shirt.
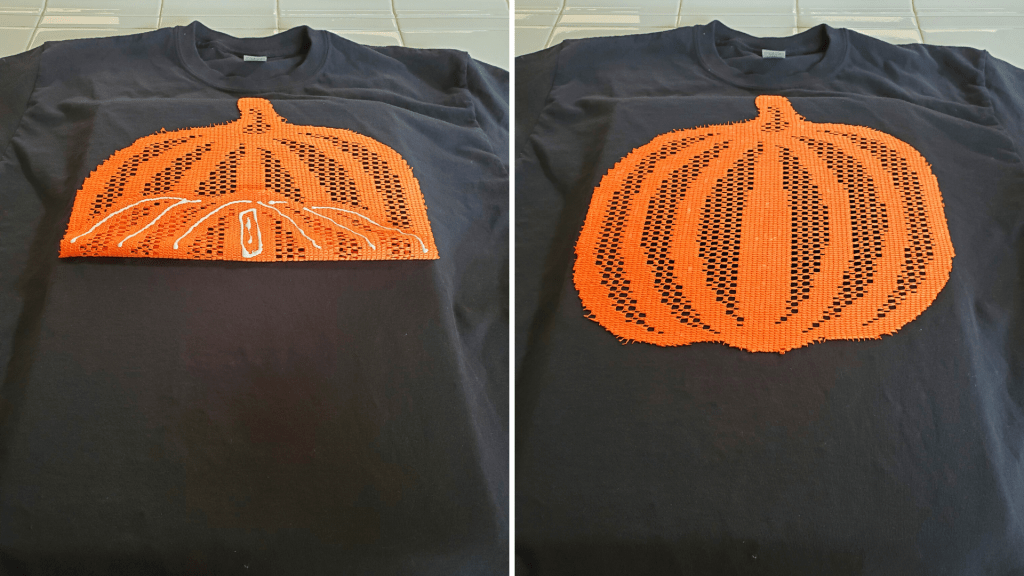
After you’ve glued the bottom half of the pumpkin doily, gently fold down the top half and apply your fabric glue. Same as before with the bottom half (and ask for help again if you need it!), slowly fold the pumpkin back over and pat the top half down so the glue will start to stick to the shirt.
Now that the pumpkin doily has been completely glued to your shirt, allow your shirt to rest for at least 30 minutes so the glue can dry. Also, make sure to let your shirt rest for at least 24 hours before washing it.
After your shirt has dried, you’ll now have a gourd-geous Pumpkin Shirt to wear it for all of your pumpkin outings and fall festivities. And let me tell you, every body (pun intended!) will be obsessed with it!

Happy fall (well, almost), Hallow-queens! Let me know in the comments below if you’d rock this spooktacular shirt this season!
And, as always, head to my TikTok account to check out the video tutorial for this Pumpkin T-Shirt!
