
This keychain is such a cute way to tell your valentine they have the key to your heart, isn’t “knit”?
(Disclaimer: This post contains gifted product. The clay and modeling tools used for this project were provided for free by Staedtler North America & FIMO, but this post 100% mine and all opinions are my own. For full transparency, you can see all of The Colorventurer’s gifted posts by searching “gifted” on this site.)
It goes without saying that Valentine’s Day gifts should be packed with lots and lots of love—that’s why I prefer to make a handmade gift for Hearts Day to show your loved one just how much you care for and appreciate them. Because when you actually take the time to make a gift, your recipient knows you really put your heart into it. And what better way to tell your loved one that they hold the key to your heart than by gifting them a homemade keychain! (It also makes for a cute Valentine’s Day accessory for you, too!) It’s a gift that your loved one is sure to appreciate and actually use every day on a bag, for keys, etc.
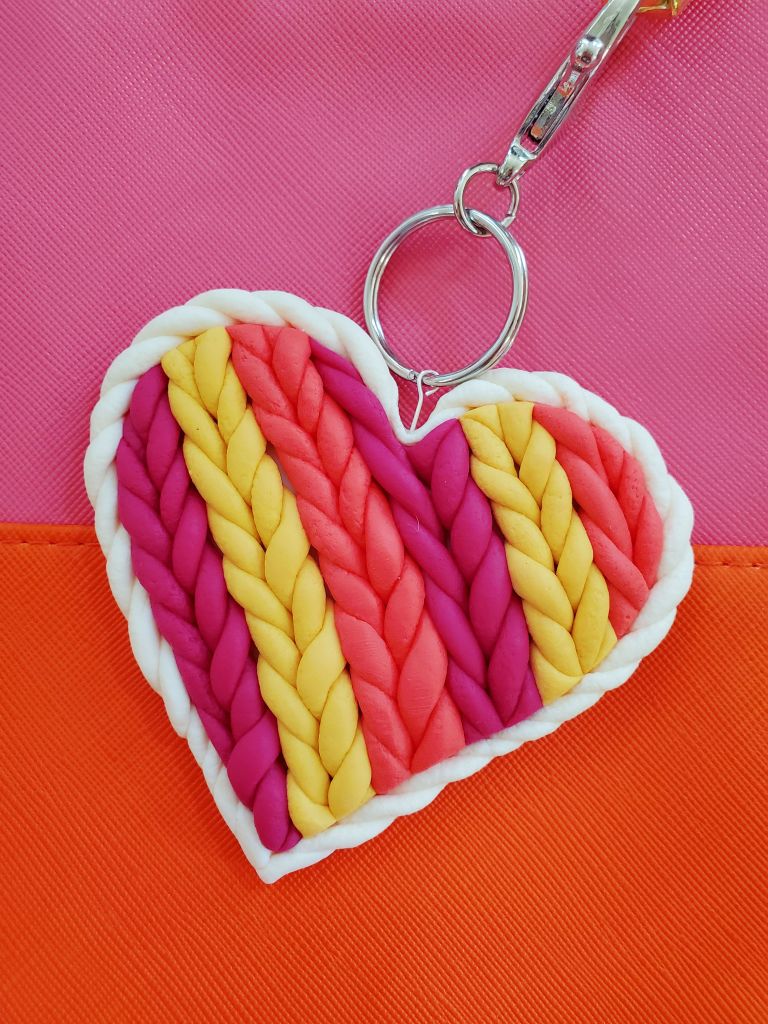
This Faux Chunky Knit Heart Keychain primarily only calls for modeling clay and is very simple to make, whatever your skill level may be. Plus, it is such a cute accessory to gift!

Read on below to learn how to make your own Faux Chunky Knit Heart Keychain!
Here’s What You Need:
- Staedtler FIMO Clay (I used FIMO Leather-Effect Clay provided by Staedtler & FIMO)
- A roller (Acrylic roller provided by Staedtler & FIMO)
- A flat surface to roll out clay on (I used a a flat board)
- Cutting/moldeling tools (I used modeling tools provided by Staedtler & FIMO)
- A heart cutter (I just used a cookie cutter)
- An eyepin
- A keychain

How to Make Your Faux Chunky Knit Heart Keychain:
On a flat surface, start by rolling out the base clay of your heart (after massaging your clay first so it’s pliable). This will be what you lay all of the faux chunky knit parts on. For the base of my heart, I decided to use the FIMO Leather-Effect in Ivory. Roll out the clay to about 1/4″ thick or so, and, with your heart-shaped cookie cutter, gently press it into the clay without cutting it all the way through. This will be your guide as you fill up the entire heart with the rest of the clay.

Once you have the base of the heart ready, set it aside to begin working on the faux chunky knit.
From here, get out your other clay colors. For my heart, I used three other colors (Berry, Saffron, and Watermelon), but feel free to use as many or as few as you’d like. Get creative and personalize it to your taste!
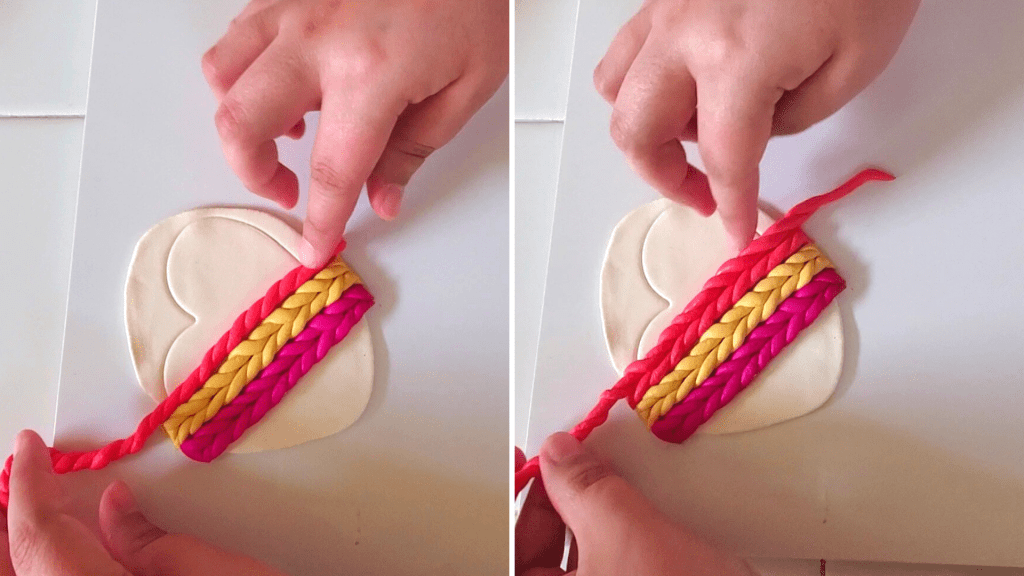
Starting with the clay in Berry, I massaged the clay until it was workable, then I gently rolled it into a thin(ish) long strand (as shown below). You can make your strands as thick or as thin as you’d like; the thicker the strands, the chunkier the knit will be. Make sure that your strand is long enough to cover the left edge of the heart on a diagonal. You can trim your strand to that length so it’s smaller and easier to work with once we create the knit effect. Next, roll out one more strand of the same thickness and cut it so both strands are the same length.

Now, delicately picking up both strands, gently press two of the ends together so they’ll stay together while twisting them. Grabbing the strand on the left, gently twist it around the other strand and continue to twist it until the strands are completely twisted around each other. If there is a bit of space between each twist, gently twist the entangled strands on both ends and the twists will come closer together. Next, take your twisted strands and lay it along the left edge of the heart on a diagonal (as shown below) and gently press it into the base of the heart.

To finish off the chunky knit-look for this section, roll out two more strands of clay like you just did. Now, when you go to twist the clay, gently pinch together two ends like before, but instead of twisting with the left strand, take the right strand and twist it around the left. Again, if there is large spaces between each twist, take both ends and gingerly twist them to make the spaces smaller.
Take the strand and delicately lay it down next to the other strand already on the heart. Line it up so that next to each other, the twists of two strands make a “V” shape, thus looking like it was knitted (like shown below).

To fill up your heart, keep following this twisting pattern for each section (as shown below). I ended up twisting strands for six different section (Berry, Saffron, and Watermelon x 2).

Once the heart is completely filled in with the different colored knitted sections, take the heart cutter again, line it up with your original heart markings, and press down all the way to cut through all of the clay. By doing this, it will seal all of the edges so the faux chunky knit section will be secured to the bottom of the heart.

Now, set the heart aside and work on the twisted border for the heart.
Take the original color you used for the base of the heart and roll out two long strand (similarly to before). This time, however, you will need the strands to be long enough to go completely around the edge of the heart. Take both strands and pinch together two ends and twist the two together like before. Once the strands are twisted together, wrap it around the heart, starting at the bottom point. When it gets to the top of the heart, it helps to use a modeling tool to push the the twisted border into the dip at the top, then continue to wrap the border around the heart until it reaches the bottom tip. At the bottom, carefully trim off any excess and gently press the two parts together to form the tip of the border. Then, go around the heart and gingerly press the border into the heart so it sticks to the other clay.


Once the border is pressed against the heart, take an eyepin and slowly slide it into the center dip at the top of the heart (as shown below), leaving the loop of the eyepin slightly higher than the top curves of the heart (also shown below).

Next, place the heart onto a parchment-lined baking sheet and place it on the bottom rack of a pre-heated 265°F oven for 30 minutes to harden.
Remove the heart from the oven to let it cool completely.
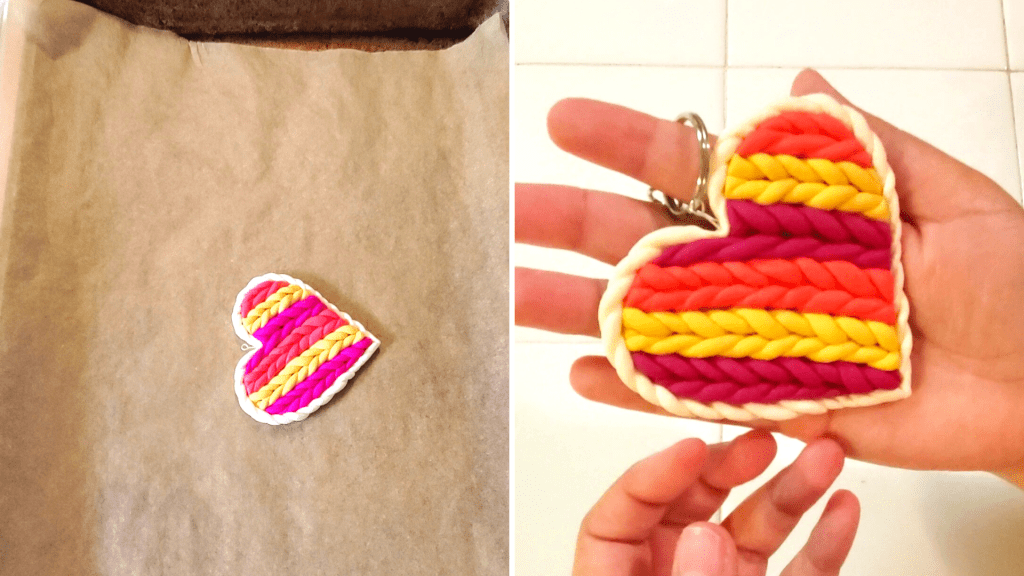
Once the heart has cooled, add your keychain ring by sliding it onto the eyepin.
There you go! You now have the cutest Faux Chunky Knit Heart Keychain!
It certainly makes for the prettiest Valentine’s Day gift (or accessory)!

What do you think of this Faux Chunky Knit Heart Keychain? Let me know in the comments below!
As always, you can find the video tutorial (with commentary to walk you through every step!) for this Faux Chunky Knit Heart Keychain on my TikTok.
Have a wonderful Valentine’s Day!

I really like this for valentines gift. I’m not really crafty, but you make it sound pretty simple and my daughter would love it. She loves accessories. Thanks for the idea!
LikeLiked by 1 person
This is a fun Valentine’s DIY for all skill levels! If she loves accessories, this would be a great gift, or at least a project, for her! I’m glad you liked it!
LikeLiked by 1 person
This is so original and colourful. You have a new follower!
LikeLike
Thank you so much! And I am thrilled to hear it! Welcome to The Colorventurer!
LikeLike
Tried it and very efficient!
LikeLike
First of all, welcome to The Colorventurer! Secondly, I am so happy to hear that you tried out this DIY and that you found it easy to do! I hope you try out some of the other fun Valentine’s Day crafts on here and stay tuned for more!
LikeLike