
Add some Disney magic to your Halloween by making a Mickey Mouse Pumpkin inspired by the iconic Main Street Mickey Mouse pumpkin! All you need are some craft pumpkins, paint, and hot glue!
Hiya, pals! It’s officially Spooktober! It’s time to start decorating (or carving!) all those pumpkins to decorate the house or front yard.
I love to create fun pumpkins for Halloween. As you may remember, last year I created the cutest set of M&M pumpkins that were totally sweet. When thinking about what fun Halloween pumpkin to create this year, I decided what better pumpkin to make than a recreation of the iconic Main Street Mickey Mouse pumpkin!

Using one large and two small craft pumpkins and some paint I was able to easily create this adorable pumpkin that will certainly add some magic to your Halloween.
This pumpkin is perfect if you or any of the little ones are a Disney lover!
Read on to learn how to make your own Mickey Mouse Pumpkin this Halloween!
Here’s What You’ll Need:
- One large craft pumpkin for Mickey’s head
- Two small craft pumpkins for Mickey’s ears
- Pumpkin Mickey face template (this is optional, but makes it way easier – you can download this free template!)
- Scissors
- Painter’s tape
- Orange and yellow paint
- Paintbrushes/painter’s palette or paper plate
- Hot glue gun
- Paper or table cloth to cover your work station

Here’s How to Make Your Mickey Mouse Pumpkin:
Start by painting all three of your craft pumpkins orange. The large pumpkin I used was already orange, but my small pumpkins were cream, so I wanted to make sure they were all the same color. If you can snag one large and two small craft pumpkins that are all orange, great! Allow for the craft pumpkins to dry completely after painting them.

Once the craft pumpkins are dry, apply a second coat of paint if needed and allow them to dry completely again.
Now, it’s time to prepare to make Mickey’s face. To make it even easier, you can download the template I have linked above. Cut out the facial features on the template with a pair of sharp scissors to create the template for painting.

Take the large craft pumpkin and, with some painter’s tape, secure the template to the center of the pumpkin. Using a paintbrush (I highly suggest using a dabber), apply some yellow paint to the paintbrush and brush (or dab) over the template.

Once the template is filled in, carefully remove the template from the craft pumpkin. At this point, you can use a small paintbrush to touch up any spots.
Allow the large craft pumpkin to dry once more.

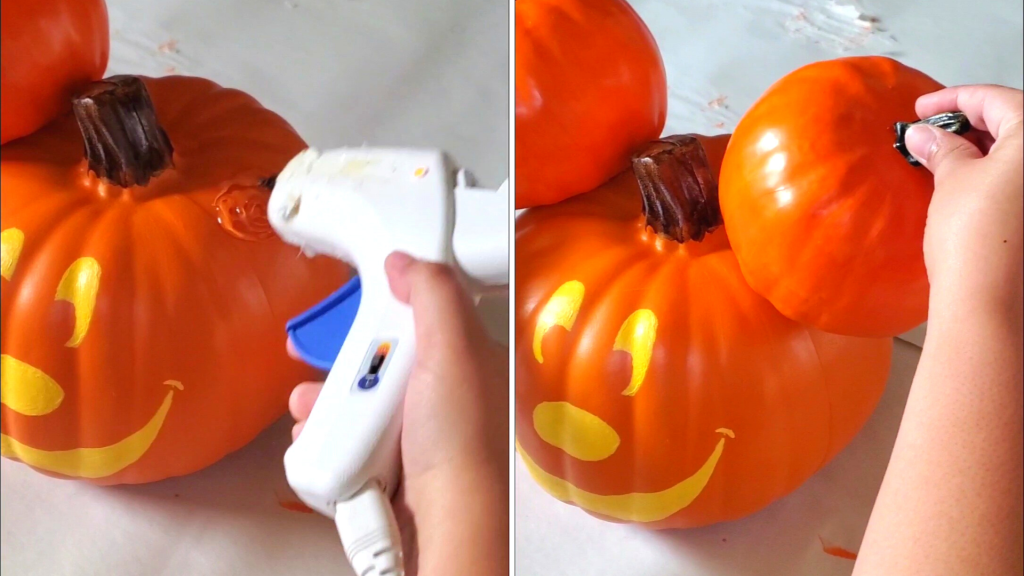
When the pumpkin has dried, you can add the ears! With a hot glue gun, apply hot glue on the top left of the large craft pumpkin and firmly press the base of one of the small craft pumpkins onto the hot glue. Keep holding the small pumpkin down unless the glue has set and the pumpkin is firmly stuck. Repeat the process for the other small craft pumpkin to create the right ear.
That’s it! Your Mickey Mouse Pumpkin is ready!

Isn’t he so cute?! It looks just like the giant Mickey Mouse pumpkin that you can find on Main Street!
Would you create this Mickey Mouse Pumpkin to add some Disney magic to your Halloween? Let me know in the comments below!
As always, you can find the video tutorial for this Mickey Mouse Pumpkin on my TikTok!
Before you go, make sure to save this post to your Halloween or Disney Pinterest board! (You can find the Pinterest button at the bottom of this article.)
Happy Halloween and boo to you!

That is really cool! 😎👍
Definitely a must for Halloween 🎃
LikeLiked by 1 person