
Looking for the perfect holiday accessory to add to all of your outfits? You *need* this “Letter to Santa” Clutch.
(Disclaimer: This post contains gifted product. The fabric markers used for this project were provided for free by Tulip Color, but this post is 100% mine and all opinions are my own. For full transparency, you can see all of The Colorventurer’s gifted posts by searching “gifted” on this site.)
You better watch out. You better not cry. You better not pout. Because Santa Claus is coming to town—that’s why!
One of the most magical parts about Christmas, in my opinion, is when Santa comes to town. I love seeing Santa at the mall with all the kids brimming with excitement to tell him all of their holiday wishes and on all of the commercials on TV and holiday greeting cards. He is just such a gleeful old man who reminds us that we all need to be good—to ourselves and to others. In my household, we love Jolly Old Saint Nicholas so much, we dedicate a tree just to him for Christmas. Actually, it’s our main tree, too! So, of course, when creating a fun craft for Christmas, I had to include St. Nick in it somehow!

To help you look extra festive for the holidays, I have created a DIY “Letter to Santa” Clutch! This merry (Christmas) clutch is certainly the perfect accessory to pair with any holiday outfit and would even be such an adorable gift to give to that accessory-loving friend! After all, you’re never too old to “write” that letter to Santa!
Read on below to learn how to make your own DIY “Letter to Santa” Clutch!
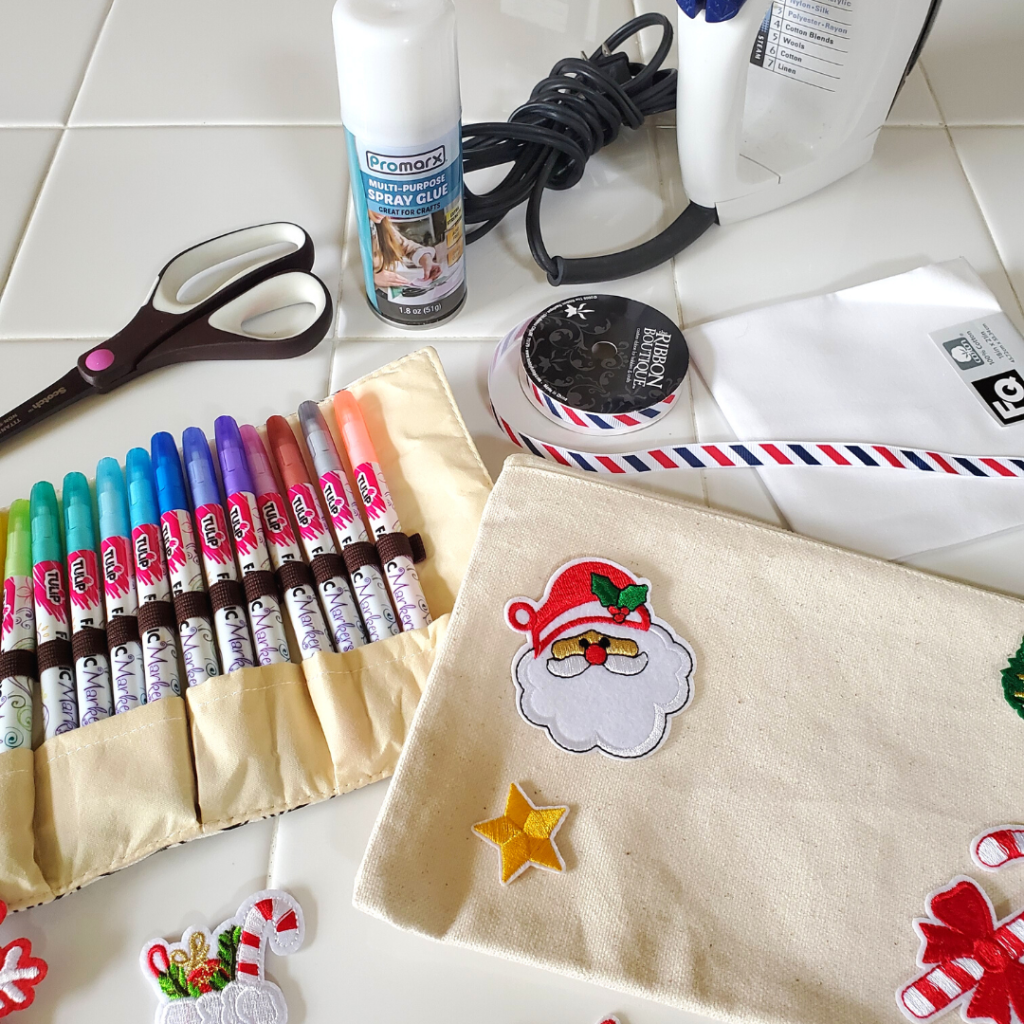
Here’s What You’ll Need:
- A canvas pouch
- Striped ribbon
- Decorative holiday iron-on patches
- Spare fabric
- Fabric glue (you can use the spray kind or traditional fabric glue—I ended up using Aleene’s Fabric Fusion)
- A black Tulip Color Fabric Marker (fabric markers were gifted by Tulip Color)
- Scissors
- An iron
Here’s How to Make Your Own Christmas Clutch:
To begin making your DIY “Letter to Santa” Clutch, measure out your striped ribbon along the edge of the canvas pouch. I opted to get this ribbon (I found it at Hobby Lobby) because I liked how it gave the canvas pouch this old-fashioned postcard look. Measuring along the edges of the canvas bag, I mitered each edge of the ribbon so as to make a clean corner where the pieces of ribbon met. To miter each corner, simply cut at a 45° angle at the end of the ribbons where the two parts will be joined to form a neat 90° angle when the two edges meet. Do this for all four sides of the canvas pouch.
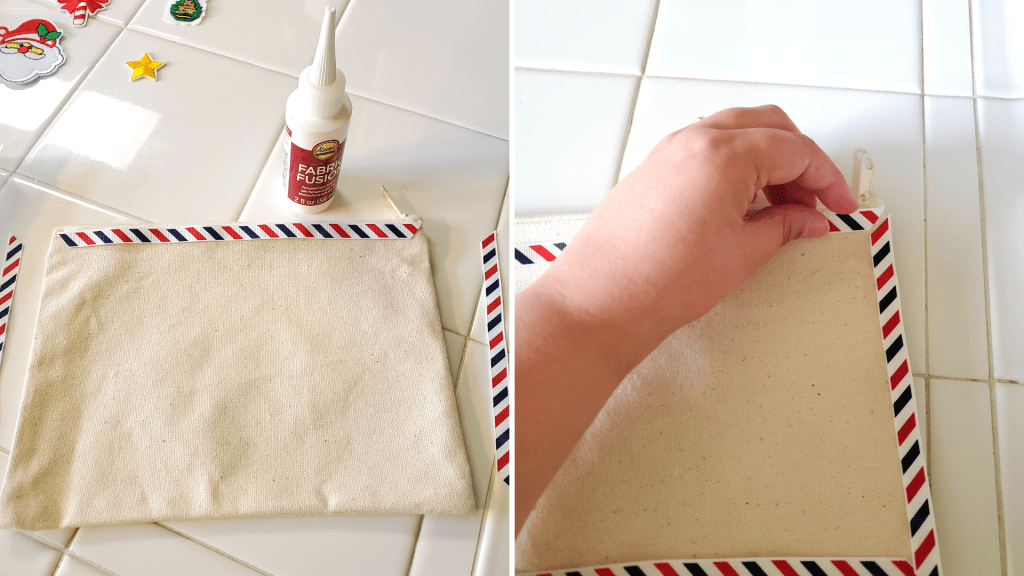
Once you have all of the ribbons measured and cut, apply fabric glue to the back of each piece of ribbon, place the ribbon along the each edge of the canvas pouch, and gently press them down until they stick to the bag. After all four pieces of ribbon are glued to the canvas pouch, set the clutch aside to allow for the glue to dry.

When the glue has fully dried, it’s time to really get into the fun stuff: Decorating your “Letter to Santa”!
Take whatever festive iron-on patches you have on hand or found at the craft store or online (Etsy has some great ones!) and lay them out on your canvas pouch. Get creative with it and make a fun layout that represents you for your letter!
Once you have a layout that you like, fire up your iron. (Make sure to follow the directions for your iron-on patches!) After I had my patches laid out in the design I liked, I took a piece of scrap fabric and laid it over my patches to protect them while ironing them on and began ironing in short, gentle back and forth motions until each patch was bonded to my clutch.
Since this clutch is a “Letter to Santa”, you’re going to need postage!

For my stamp, I ironed on a small Christmas tree patch to some of my white scrap fabric and then scalloped the edges of the white fabric with scissors to make it look more like a stamp. I then used the Aleene’s Fabric Fusion to glue the stamp to the clutch. I let the bag sit aside again until the glue was completely dry.

Now comes the most important part: Addressing your letter to the big man himself, Santa!
Using a black Tulip Fabric Marker, I added postmark lines to my stamp so I knew it would be on it’s way to Santa himself! Feel free to add these to your letter if you like!
Lastly, you need to address your letter to Santa! You can even write an actual message or a funny little saying like, “Santa, I can explain…” Have fun with it!

Once you have your letter all complete, let the clutch completely dry before taking it out to the mailbox. Ha!
There you go! Now you’ve officially written your “Letter to Santa”! How cute is it?!

This was such a fun Christmas craft and I hope you try it out!
What do you think of this DIY “Letter to Santa” Clutch? Would you make one? Let me know in the comments below!
As always, you can watch the video tutorial for the DIY “Letter to Santa” Clutch on my TikTok!
Have a very Merry Christmas and I hope you get everything you asked Santa for!

I think you hit on a pretty “crafty” idea with this one. I know my daughter is all about Christmas and loves to craft. She’ll have a blast with this! 🎅👍
LikeLiked by 1 person
Thank you so much! And how awesome! Make sure to share this with her—I think she would have a lot of fun making one!
LikeLiked by 1 person
Oh my gosh! I love this! Such a fun craft and fashionable! Love it!
LikeLiked by 1 person
Thank you so much, Shelby! I’m so happy that you love it!
LikeLiked by 1 person